
Italian Buildings - Stables

Recently I received a bunch of buildings from Charlie Foxtrot and had some time to work on them.

I have a few buildings to fill out the table. Not having done these before I decided start and finish one before having more a production line.

I followed Charlie Foxtrot's tutorial which can be found on their blog. The tough part for me was to find some colours that suited as I am in Australia and the tutorial was UK based.

Today I chose to start with the relatively small stables.

First some easy assembly, so basically PVA to bond the MDF and superglue for the Resin to MDF pieces. All the buildings come with pretty good instructions and only the resin pieces need a bit of persuasion to fit!

The roof comes in one piece of solid resin, its really nice!


After assembly its on to filler. I used the same 'Spakfilla' from Bunnings I used on my urban boards. Basically a thin coat over most of the model leaving a few areas blank. Once dried, roughly sand down the filler.

In the blank areas, apply some PVA and sand


After this step I applied some more filler to give it a less patchy and more rustic look. Then I undercoated it with Army Painter Desert Sand Primer. You could also use Citadel Zandri Dust (it will probably work better if you wanted a more sun bleached look).


To create more variation I then picked out a few areas with Liquitex Heavy Body Raw Sienna arcylic paint in areas where shade would naturally fall. Going forward I would probably mix this with a lighter colour so it is not so extreme.


After drying, I drybrushed the model with a 50/50 mix of  Raw Sienna and Jo Sonya's Provincial Beige acrylic paint. As stated above I will probably use this mix as my lowlight next time and work my way up from there.

I then did further drybrushing with Provincial Beige and then finally a drybrush of Matisse Australian Ghost Gum. If you are finding it hard to get Australian Ghost Gum I think its fairly similiar to Vallejo's Dark Sand (70.847).


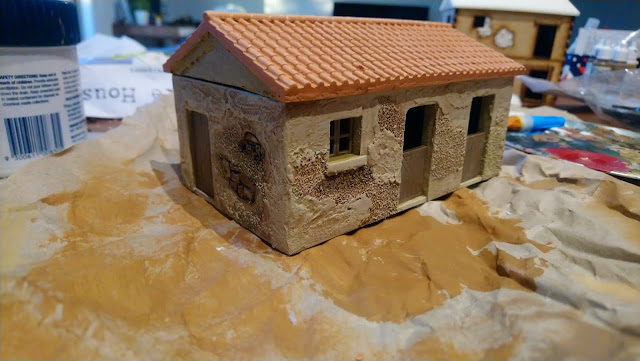
It was then time to work on the roof! The roof was painted in Dulux Terracotta Chip, 2 thin coats should do it. It was then drybrushed with Dulux Italian Clay.


Lastly the doors and windows were painted. There are a few options with this kit, I elected for two half doors so it looked more like a stable.

These were all painted in Vallejo Flat Earth (70.983) and then drybrushed with Army Painter Monster brown and then finally with Citadel Eldar Flesh.


Sticking in the doors and windows gave me the complete model! I am quite happy with it for a first attempt.


That's all for today, I hope to bring you some more buildings as I get through them!

Comments

  1. Looking good. I have some Italian terrain to do, and I am looking for inspiration.

    ReplyDelete
    Replies
    1. Thanks mate - let me know if you need any more information!

      Delete

Post a Comment

Popular posts from this blog

World War 2 Italian Terrain - Vineyards (Part 1)

Hello everyone, After finishing the Mid-Century boards and playing on them a few times (I hope to put a battle report up eventually), I have once again begun making terrain. This time its my long awaited Italian board. So broadly speaking I want to make a board which I can play WW2 games (mostly Bolt Action and Chain of Command) on. I want this board to be a mostly rural setting that looks like Italy but could also conceivably be Spain, Portugal, Greece, Yugoslavia and, at a stretch, greener parts of North Africa (including Tunisia and Cyrenacia). This theatre flexibility will allow me to use the terrain for other games as well like Sharp Practice (for Austrians/French in Northern Italy or Peninsula War) and Spanish Civil War. Unlike my Mid-Century Board, this will be less like a diorama and more of a traditional gaming table. For instance, where on the Mid-Century Board everything had its place, for the Italian board I am planning on some big green boards/felt mat on which I w

Gebirgsjagers - Chain of Command

Hi All I have been a long time table-top gaming enthusiast but have never really collected until recently. Something that I have never done due to time, talent and direction is painted. I suppose for me the collecting went hand in hand with the painting and as I could not paint, I did not collect and therefore I did not game. Well last year I decided to try my hand at painting. While I continue to learn a lot and my efforts are not the best I am a lot more confident that if I try I may be able to get a 'table-top' standard I am happy with. Anyway last year I began to paint some German Gebirgsjagers, however I noticed that there is no list in Chain of Command for them yet. They are quite similar to regular German infantry so with a bit of research and CoCulator help I settled on the below - Comments appreciated. Germany Heer Gebirgsjager Rifle Platoon (Pre 1942) Introduction The German Gebirgsjager (mountain infantry) of World War Two found its origins in

Chain of Command - First after action report (solo game)

I have recently built and bought some Terrain for my Italian board. This was the first occasion I could pull together enough stuff to make a 4ft x 4ft board and play a game. Not everything is perfect – I want to do more work to the field, base the trees, build hills and rocky outcrops, drybrush the roads, build/buy new walls and paint more miniatures. But I finally got to play so I was very happy! I played a solo game of Chain of Command. The basic fluff was the allies have landed in Sicily and after an easy day on the beaches they begin to push inland. The scenario was flank attack with the US 82 nd Airborne attacking and the Italian Aosta Infantry Division defending. With the scenario and force rating differences the Italians had nine support points and the US had four. The US brought a M8 Scout Car and a predatory bombardment (I’d imagine naval guns in the Mediterranean). The Italians had a tripod MMG and a M14/41. To start the patrol phase the Italian star